
TiviMate is the undisputed king of IPTV players in 2026 — a sophisticated, endlessly configurable application that transforms any Android-based device into a premium home entertainment powerhouse. If you have been bouncing between clunky apps, suffering through pixelated streams, or simply exhausted by the guesswork of IPTV setup, this guide was written specifically for you. Over the next 3,000 words, we will walk through everything: hardware choices, installation methods, premium unlocking, EPG mastery, buffer elimination, recording workflows, and long-term maintenance. By the time you reach the final section, you will understand exactly why TiviMate has become the benchmark that every competitor is measured against — and why no competitor has managed to close the gap.
Table of Contents
Understanding the Foundation: What TiviMate Actually Is
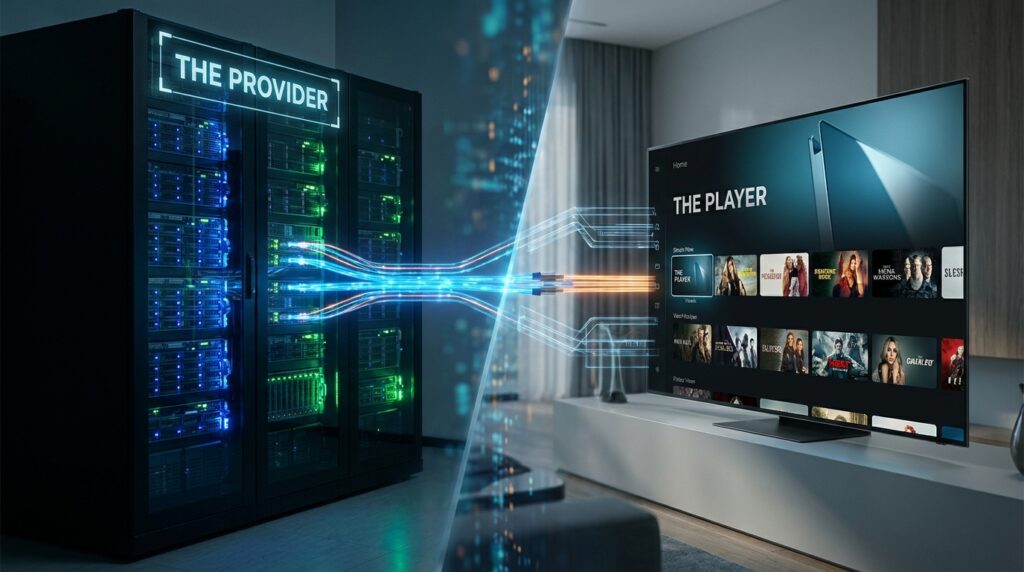
Before diving into clicks and configurations, it is worth understanding what you are working with at a conceptual level. Think of the TiviMate IPTV Player the same way you think about a high-end Blu-ray player — it is the hardware and the interface, not the content itself. The content comes from your IPTV provider, which acts like the streaming library. The TiviMate IPTV Player reads that library and displays it in a clean, feature-rich interface. This distinction matters because people often confuse the app with the service. The app never hosts channels. It simply presents them in the most professional way possible.
This architecture also means that the quality of your experience depends on two separate pillars: the player settings you configure and the quality of the IPTV subscription you choose. A perfectly tuned player on a bad IPTV subscription still buffers. A great subscription plugged into a poorly configured player wastes its potential. The goal of this guide is to optimize both pillars simultaneously.
Hardware Compatibility in 2026
The TiviMate IPTV Player runs on Android TV, Google TV, and Amazon Fire TV devices. Each platform has trade-offs. Android TV boxes like the Chromecast with Google TV offer a clean, Google-certified environment where the app installs directly from the Play Store without complications. Amazon Firestick devices are more popular and affordable but require sideloading since the app is not available on the Amazon Appstore.
The Nvidia Shield Pro remains the gold standard for power users in 2026. Its dedicated GPU handles hardware decoding exceptionally well, which directly reduces the processing load during 4K streams. The Shield also supports advanced buffer management features that lower-end devices simply cannot access. If you are serious about building a long-term home entertainment system and want the best iptv player experience available, the Shield Pro is the hardware investment that makes everything else easier. The TiviMate IPTV Player takes full advantage of the Shield’s hardware decoding pipeline, making it the definitive combination for anyone chasing the best iptv player setup money can build.
The Internet Connection Question
Wired Ethernet is not optional for serious IPTV users — it is strongly recommended. Wi-Fi introduces packet loss, signal interference, and inconsistent speeds, all of which manifest as buffering. A gigabit Ethernet connection delivers consistent latency that a Wi-Fi 6 router simply cannot match under real-world conditions. If running a cable is genuinely not possible, position your router as close to your device as physically feasible and use a 5GHz band exclusively.
A VPN adds another layer of reliability by preventing ISP throttling. Many internet providers intentionally throttle streaming traffic during peak hours. A reputable VPN like ExpressVPN or NordVPN routes your traffic through an encrypted tunnel that the ISP cannot classify as video streaming, which eliminates throttling-related slowdowns entirely.
Installation: Play Store, Sideloading, and Version Management
Standard Play Store Installation
For Android TV and Google TV users, installation is straightforward. Open the Google Play Store, search for the TiviMate IPTV Player, and install. The free version installs immediately with no additional steps. This path is the cleanest and ensures you always receive automatic updates. It is also the most reliable way to keep the best iptv player on your device in sync with the latest feature releases.
Sideloading on Amazon Firestick
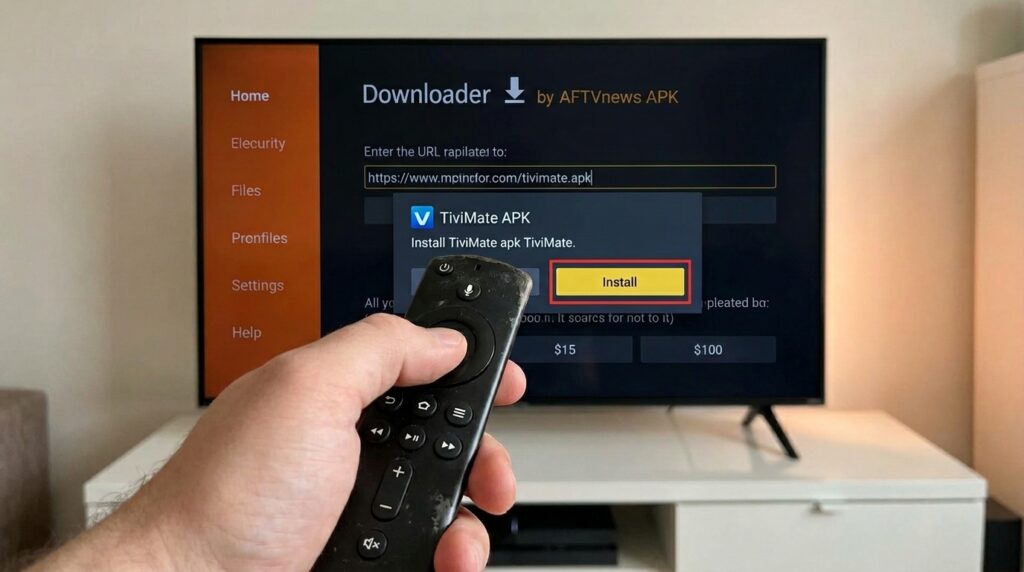
Firestick users must enable third-party app installation before proceeding. Navigate to Settings → My Fire TV → Developer Options and toggle “Apps from Unknown Sources” to ON. Next, install the Downloader app from the Amazon Appstore — this is a free utility that functions as a browser and file downloader in one. Open Downloader, type the code 272483 into the URL field, and it will automatically fetch the latest official APK from the TiviMate website. Follow the on-screen prompts to install.
Version Management
Not all users want the newest build. Those running older Amazon Fire TV Sticks — particularly the second and third-generation models — sometimes find that version 4.7.0 or 5.1.6 runs more smoothly than the latest release due to memory constraints. If you experience crashes or interface sluggishness on older hardware after updating, sideloading a specific legacy APK is a legitimate solution. APKMirror maintains a reliable archive of older builds. Always download from trusted sources to avoid modified APKs.
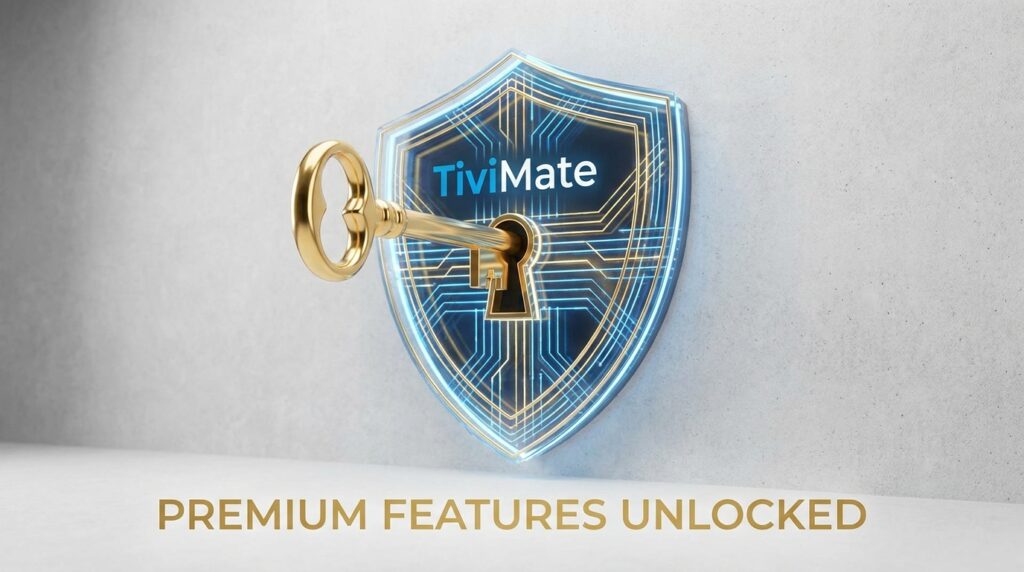
Unlocking TiviMate Premium: The Full Feature Set
Free vs. Premium: A Practical Comparison
The free version of TiviMate supports a single playlist and offers no access to VOD libraries, catch-up TV, or recording. It is a reasonable starting point for testing compatibility with your device, but it is not a sustainable long-term setup. TiviMate Premium removes every one of those restrictions. It is a reasonable starting point for testing compatibility with your device, but it is not a sustainable long-term setup. TiviMate Premium removes every one of those restrictions. You can connect multiple playlists simultaneously, access full Electronic Program Guide functionality, enable catch-up TV, record live broadcasts, and use the multiscreen viewing mode. For anyone running a legitimate IPTV subscription, the premium unlock is not optional — it is essential.
The TiviMate Companion App
The purchase process for TiviMate Premium goes through the TiviMate Companion app, which is available on the Google Play Store for Android phones. This is not a flaw in the system — it is a deliberate design choice that keeps purchases managed through a trusted mobile platform. If you do not own an Android phone, you can run the Companion app inside BlueStacks, a free Android emulator for Windows and Mac. The Companion app is the official gateway that links your TiviMate account to all your devices under one license.
Open the Companion app, create an account using your email address, and complete the purchase through the Google Play billing system. Your account can be linked to up to five devices simultaneously, which makes TiviMate Premium an excellent value for households with multiple televisions.
Pricing in 2026
The TiviMate Subscription is available as an annual plan or a one-time lifetime purchase priced at $33.99. For most users, the lifetime option represents superior value — pay once, own it forever, and never worry about recurring charges. The annual subscription makes sense for users who are still evaluating whether IPTV fits their lifestyle long-term.
Device Activation
Once your account is created and the purchase is complete, open TiviMate on your television, navigate to Settings → Account, and log in using the credentials you created in the Companion app. The premium features activate immediately. If activation fails, force-close the app, clear its cache from the device storage settings, and reopen it. This resolves the vast majority of activation issues.
Connecting Your IPTV Provider: Playlists and Input Methods
Choosing the right IPTV provider is arguably the most consequential decision in your entire setup. The player can only be as good as the stream it receives. Look for providers that offer server uptime guarantees above 99.5%, multiple server locations, and responsive customer support. Services like Even IPTV and Bentvpro have strong reputations among experienced users in 2026 for offering stable streams with reliable EPG data.
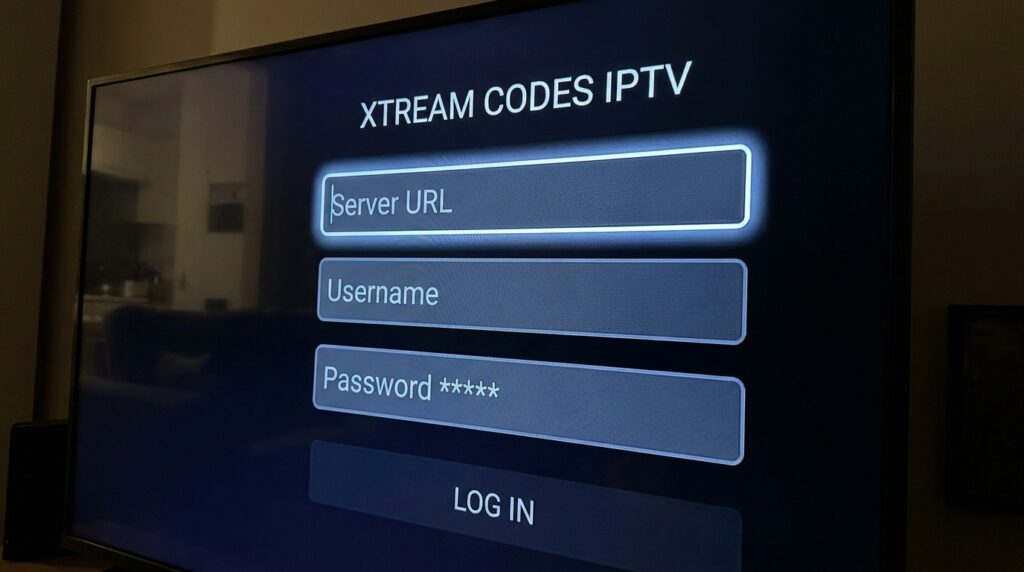
Xtream Codes: The Gold Standard
When your IPTV provider supports Xtream Codes — and most reputable ones do — use it. Xtream Codes connects your server credentials (username, password, and server URL) directly to TiviMate IPTV, enabling automatic VOD library imports, organized channel categories, and more stable authentication. Navigate to Settings → Playlists → Add Playlist → Xtream Codes and enter the three credentials your provider supplied.
M3U URLs
M3U is the simpler of the two formats. Your IPTV provider supplies a single URL that contains the full channel list. Paste it into Settings → Playlists → Add Playlist → M3U URL. The downside of M3U is that VOD content is sometimes less organized, and re-authentication can be more complicated if your credentials change. Use M3U when Xtream Codes is not available.
Stalker Portal
Some older-style providers still use Stalker Portal systems that authenticate using a device MAC address rather than a username and password. TiviMate supports Stalker Portals natively. Go to Settings → Playlists → Add Playlist → Stalker Portal and enter the portal URL along with your MAC address. Note that Stalker-based services often feel less stable than Xtream Codes alternatives, so treat this as a compatibility option rather than a preferred method.
Managing Multiple Playlists
One of the biggest advantages of TiviMate Premium is the ability to manage multiple playlists simultaneously. This lets you combine a primary subscription with a backup provider, or separate a personal account from a family account. Within the playlist manager, you can hide entire channel groups (like adult content or international packages you never watch) to keep the interface clean and navigational.
EPG Configuration: Getting Your TV Guide Right
Why EPG Matters
An Electronic Program Guide turns a raw list of channels into a television experience. Without it, you are scrolling through channel names with no idea what is currently airing or what comes next. A well-configured EPG inside TiviMate IPTV feels identical to a cable or satellite TV guide — program descriptions, start times, series information, and the ability to schedule recordings from the guide itself.
Adding External EPG Sources
If your IPTV provider does not supply EPG data or supplies it incompletely, external sources fill the gap. Navigate to Settings → EPG Sources → Add EPG Source and input a URL from sources like epgshare01.online or open-epg.com. These are community-maintained XML files that cover thousands of channels across dozens of countries. Add two or three sources to maximize coverage.
Set the update interval to 24 hours and enable “Update on App Start” so that the guide refreshes automatically every time you launch the app. This ensures you always see accurate scheduling without manual intervention.
Manual Channel Mapping
Occasionally, a channel in your list does not match the EPG entry automatically. The guide shows “No Information” despite the external source containing the correct data. Fix this through Settings → Channels → select the problem channel → Edit → TV Guide → Search and manually browse for the correct guide entry. Once mapped, TiviMate IPTV remembers the assignment permanently until you clear EPG data.
Time Zone and Offset Adjustments
If your guide shows programs shifted by one or two hours — a common issue during daylight savings transitions or when using a provider hosted in a different time zone — go to Settings → EPG → Time Offset and adjust in one-hour increments until the schedule aligns with your local time. This is a minor but important calibration that significantly improves the day-to-day usability of the guide.
Eliminating Buffering: The Technical Deep Dive
Achieving true IPTV without buffering requires addressing the problem from multiple angles simultaneously. Buffer settings, output format, DNS configuration, and hardware decoding each contribute to the final result. Changing only one variable and ignoring the others rarely produces lasting improvement. Users who apply every fix in this section consistently report achieving sustained IPTV without buffering even on congested networks.
Buffer Size Strategy
Navigate to Settings → Player → Buffer Size. The optimal setting is counterintuitive for most users. If your IPTV subscription comes from a high-quality server with consistent bitrate delivery, set the buffer to “None” or “Small.” A large buffer on a fast connection actually introduces latency and can cause more problems than it solves. Reserve the “Large” buffer setting for Wi-Fi connections or unstable network environments where the additional pre-loaded data compensates for packet loss. Matching buffer size to your actual connection quality is the single most impactful step toward IPTV without buffering.
Hardware Decoding
Software decoding routes video processing through the device’s main CPU, which creates heat, lag, and dropped frames on lower-end hardware. Hardware decoding offloads this work to the dedicated video chip (GPU), which handles it exponentially more efficiently. In Settings → Player → Decoder, select “Hardware” or “Hardware (MediaCodec)” and test each option with a 4K stream. The correct choice varies slightly by device, so experimentation is necessary.
Output Format: MPEG-TS vs. HLS
MPEG-TS is the traditional broadcast format and delivers the lowest latency for live television. HLS (HTTP Live Streaming) is a newer adaptive format that adjusts quality dynamically based on your connection speed. For most live TV scenarios, MPEG-TS is superior. Switch to HLS only when a specific channel or provider stream refuses to play correctly in MPEG-TS mode.
DNS Optimization
Your ISP’s default DNS resolver is often congested, outdated, or deliberately slow for streaming traffic. Changing your device’s DNS to Google (8.8.8.8 / 8.8.4.4) or Cloudflare (1.1.1.1 / 1.0.0.1) routes name resolution through faster, less congested infrastructure. On Android TV, go to your router’s DHCP settings and assign the preferred DNS there so all devices benefit simultaneously. This single change consistently reduces buffering frequency for users on congested ISP networks and brings you closer to true IPTV without buffering.
Recording: Turning Your IPTV Into a DVR
Storage Setup
Recording requires writable storage outside the app’s internal cache. For devices with limited built-in storage — particularly the Firestick — connect an external USB drive via an OTG (On-The-Go) cable and a powered USB hub. The hub is essential because the Firestick’s USB port does not supply enough power to run a flash drive reliably on its own. Format the drive as FAT32 for maximum compatibility.
The Fire TV OS 8 ADB Workaround
Amazon locked down overlay permissions in Fire TV OS 8, which prevents the recording notification from appearing during capture. Work around this using Remote ADB Shell. Enable ADB Debugging in Developer Options, connect via Remote ADB Shell, and run:
appops set ar.tvplayer.tv SYSTEM_ALERT_WINDOW allow
This grants the necessary permission at the system level, restoring full recording overlay functionality. The command must be re-run after each Firestick restart unless you automate it through a startup script.
Three Recording Modes
Manual recording activates immediately while you are watching a live channel. Press the record button on your remote or the on-screen control, and TiviMate begins capturing instantly.
EPG-based recording lets you schedule future recordings directly from the program guide. Navigate to an upcoming show in the EPG, press Select, and choose “Record.” The app handles the rest automatically, including waking from standby if necessary.
Custom recording is for channels with incomplete or missing EPG data. Set a specific start time, end time, and date manually. This is particularly useful for sports events where the provider’s guide does not populate correctly.
Organizing Recordings
Install X-plore File Manager from the Play Store to browse and manage your recording storage. Create clearly named folders by category — Sports, Movies, Series — and configure TiviMate to save recordings to the appropriate subfolder by default. A clean folder structure becomes essential once recordings accumulate over several weeks.
Advanced Features: Catch-Up, Multiscreen, and PiP
Catch-Up TV
Catch-up allows you to rewind the broadcast schedule and watch programs that already aired — effectively a time-shifted replay function. In the EPG, long-press the Left button on your remote to navigate backward through the past schedule. Programs with catch-up availability appear with a distinctive icon. Tap to play. Note that catch-up availability depends entirely on your IPTV subscription — not all providers include it, so verify before choosing a service.
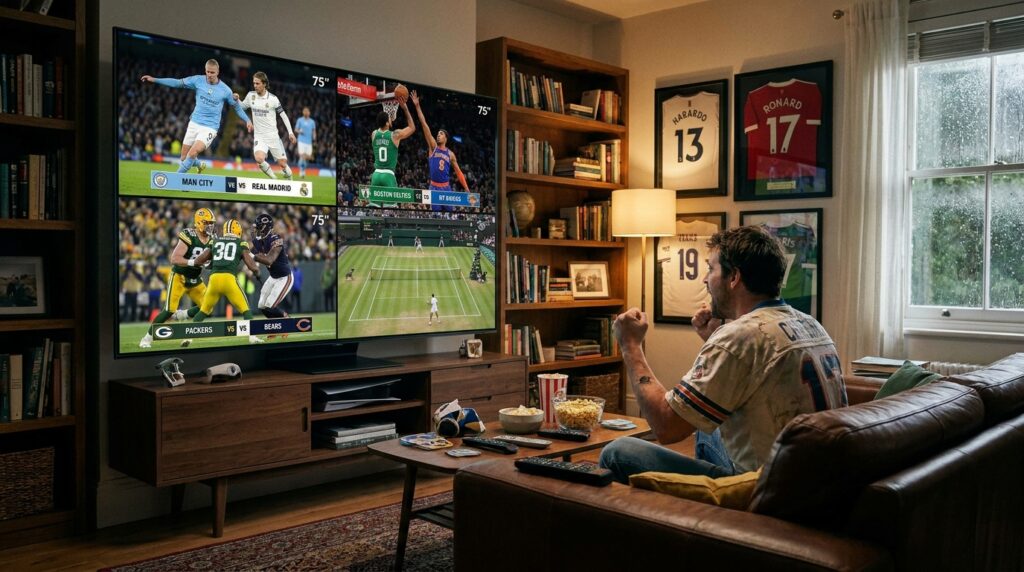
Multiscreen Mode
This is one of the most visually impressive features in TiviMate IPTV. Press the dedicated multiscreen button to split your display into two or four simultaneous streams. Each quadrant plays an independent channel. This is ideal for sports fans monitoring multiple games simultaneously or news watchers tracking several channels at once. Each stream can be individually muted, enlarged to full screen, or swapped out for a different channel without disrupting the others.
Picture-in-Picture
PiP shrinks your active stream into a small floating window that persists while you navigate the device’s home screen, browse other apps, or manage settings. Enable it in Settings → Player → Enable Picture-in-Picture. This feature requires Android 8.0 or higher to function correctly. On devices running older firmware, the PiP window may crash or fail to appear.
External Player Integration
While TiviMate IPTV handles the vast majority of codecs natively, some VOD content — particularly MKV files with unusual audio tracks or specialized subtitle formats — plays more cleanly through VLC or MX Player. Configure external player support in Settings → Playback → External Player. You can set specific file types to open in the external player automatically, keeping the internal player as the default for all live TV.
Interface Customization: Building Your Ideal Setup
Visual Personalization
TiviMate Premium exposes a full suite of interface customization options. Adjust panel transparency to let your chosen background art show through the guide overlay. Change font sizes for improved readability on smaller screens or across a large living room. Select from multiple color themes to match your personal aesthetic or your room’s ambient lighting. The goal is an interface that feels tailored to you rather than generic.
Channel Name Cleaning
Provider-supplied channel lists are frequently cluttered with prefixes like “US |”, “HD:”, “[EN]”, or country code tags that make scrolling exhausting. The Channel Names Editor — accessible via Settings → Channels → Edit Channel Names — lets you create find-and-replace rules that strip these prefixes automatically. Apply the rules globally and your channel list transforms from a technical-looking dump of strings into a clean, television-style lineup.
Custom Channel Groups
Create your own logical groups by copying channels from different playlists into a unified custom group. Navigate to a channel, press the Options button, and choose “Add to Group.” Build a “Sports” group that pulls from your primary and backup provider simultaneously. Build a “Kids” group with age-appropriate channels from multiple sources. These custom groups appear as their own category in the navigation panel, giving every member of the household their own curated starting point.
Logo Priority Settings
Channel logos sourced from your IPTV provider are sometimes low-resolution or missing entirely. Navigate to Settings → Channels → Logos Priority and set it to prefer EPG logos over playlist logos. EPG-sourced logos are typically higher resolution and more consistently maintained. For channels where neither source provides a logo, TiviMate can attempt automatic logo matching from an online database.
Maintenance, Troubleshooting, and Security
Routine Maintenance
Over time, cached logo files and accumulated EPG data can slow down TiviMate IPTV noticeably — particularly on devices with limited RAM. Clear the logos cache monthly via Settings → General → Clear Logos Cache. Clear EPG data quarterly or whenever the guide becomes corrupted. These two steps alone prevent 80% of the performance degradation that users attribute to other causes.
Backup and Restore
Your custom configuration — playlists, EPG sources, channel mappings, custom groups, interface settings — represents hours of careful work. Back it up regularly via Settings → Backup → Create Backup. Store the backup file both on a USB drive and in cloud storage. When activating TiviMate Premium on a second or third device, restore this backup to replicate your entire setup instantly rather than rebuilding from scratch.
Common Error Codes Explained
401 / 403 errors indicate an authentication failure. Your credentials have likely expired or your IPTV subscription has lapsed. Contact your IPTV provider to verify account status and regenerate credentials.
Error 456 — Max Connections Exceeded means your account is active on more simultaneous streams than your plan allows. Log out from unused devices or upgrade your subscription tier to support additional connections.
DataSourceException typically signals a temporary server outage on your provider’s end. Wait 15 to 30 minutes and retry. If the error persists across multiple channels and multiple server locations, escalate to your provider’s support team.
Parental Controls
Protect your settings and restrict access to adult content categories using the PIN lock feature in Settings → Parental Controls. Set a four-digit PIN that family members cannot easily guess. Lock both the settings menu and specific channel groups independently. This keeps younger viewers from accessing inappropriate content and prevents accidental configuration changes.
Future-Proofing Your Setup for 2026 and Beyond
Joining the Beta Program
TiviMate maintains an active beta testing community through its official Telegram channel and website. Beta testers receive access to experimental builds weeks or months before public release. This is the fastest way to stay current with new features, test compatibility with emerging device firmware, and provide feedback that genuinely shapes the product’s direction.
Evaluating Alternatives
OTT Navigator and IPTV Smarters both compete for the title of best iptv player in 2026, and both have improved meaningfully over the past two years. OTT Navigator offers strong EPG tools and a clean Android TV interface. IPTV Smarters appeals to beginners with its simplified setup process. Neither, however, matches the depth of recording options, multiscreen flexibility, or customization granularity available in TiviMate Premium. For power users who want the best iptv player experience available anywhere, TiviMate’s lead remains significant. The TiviMate Subscription also offers far better value than any competitor’s premium tier when you factor in the five-device allowance and lifetime purchase option.
Managing Your TiviMate Subscription Long-Term
Log into the official TiviMate website periodically to verify account status, review linked devices, and remove devices you no longer use. Your TiviMate Subscription supports up to five linked devices simultaneously. If you replace a television or upgrade your Firestick, delink the old device first to free the slot before activating the new one. Keeping your account organized prevents activation errors and ensures maximum flexibility. Treat your TiviMate Subscription as a long-term investment — the more carefully you manage it, the smoother your experience across every device in your household.
Conclusion: The Complete Picture
The combination of TiviMate Premium and a high-quality IPTV subscription represents the most complete cord-cutting solution available in 2026. Neither element works at its best without the other. A premium-grade IPTV provider delivers the raw content; TiviMate shapes that content into a polished, feature-rich television experience that rivals — and in many ways surpasses — traditional cable.
Achieving true IPTV without buffering is not luck. It is the result of deliberate choices: wired internet, hardware decoding, correct buffer sizing, clean DNS, and a reliable IPTV subscription from a provider with genuine infrastructure behind it. Apply the strategies in this guide systematically, maintain your setup with the routine steps outlined above, and you will have built a home entertainment system that is faster, more flexible, and significantly cheaper than anything a cable company can offer.
The TiviMate Subscription is one of the best investments a streaming enthusiast can make in 2026. Whether you choose the annual plan or the $33.99 lifetime option, a TiviMate Subscription pays for itself within the first month of use. Pair it with the right hardware, the right IPTV provider, and the configuration knowledge from this guide — and the results speak for themselves.